- 打开
powershell(以管理员方式打开) cd D:\Webstudy\react(cd到要创建react项目的文件夹)create-react-app box-app(创建box-app)- 最后看到
Happy hacking!就是创建成功了
- 最后看到
npm start- 也可以在
vsCode中打开对应目录下的box-app - 然后按快捷键`ctrl+``打开终端
- 输入
npm start即可打开React App - 最好看到
webpack compiled successfully就是连接成功了
- 也可以在
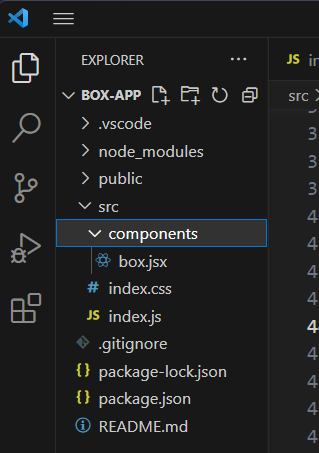
目录结构:
初始化:
- 先删除
目录、index.html、index.js中一些没用的东西 - 新建文件夹
components - 在文件夹下新建
box.jsx - 在
box.js中输入imrc(把react import进来)按回车或者tap键 - 输入cc(定义一个类组件),修改box.jsx的代码
- 在
index.js里面把定义的component加进来(import Box回车) - 把
Box加到<React.StrictMode>(<Box />) - 保存一下,看一下是否能正常在Reat App页面中输出
Hello World
修改box.jsx代码
// imrc
import React, { Component } from 'react';


// cc
class Box extends Component {
    state = {  }
    render() {
        return <h1>Hello World</h1>;
    }
}

export default Box;
修改index.js代码
import React from 'react';
import ReactDOM from 'react-dom/client';
import './index.css';
import 'bootstrap/dist/css/bootstrap.css';
import Box from './components/box';

//index.js是整js的入口
//将定义好的组件渲染出来

const root = ReactDOM.createRoot(document.getElementById('root'));
root.render(
  <React.StrictMode>
    {/* 名称和类名一样 */}
    <Box />
  </React.StrictMode>
);
安装bootstrap:
- 在
VS Code终端中输入ctrl+c - 在
VS Code终端中输入npm install bootstrap - 在
index.js中将bootstrap引入进来import 'bootstrap/dist/css/bootstrap.css'; - 启动项目
npm start
index.html
<!DOCTYPE html>
<html lang="en">
  <head>
    <meta charset="utf-8" />
    <link rel="icon" href="%PUBLIC_URL%/favicon.ico" />
    <meta name="viewport" content="width=device-width, initial-scale=1" />
    <meta name="theme-color" content="#000000" />
    <meta
      name="description"
      content="Web site created using create-react-app"
    />
    <link rel="apple-touch-icon" href="%PUBLIC_URL%/logo192.png" />
    <link rel="manifest" href="%PUBLIC_URL%/manifest.json" />
    <title>React App</title>
  </head>
  <body>
    <noscript>You need to enable JavaScript to run this app.</noscript>
    <div id="root"></div>
  </body>
</html>
index.js
import React from 'react';
import ReactDOM from 'react-dom/client';
import './index.css';
import 'bootstrap/dist/css/bootstrap.css';
import Box from './components/box';

//index.js是整js的入口
//将定义好的组件渲染出来

const root = ReactDOM.createRoot(document.getElementById('root'));
root.render(
  <React.StrictMode>
    {/* 名称和类名一样 */}
    <Box />
  </React.StrictMode>
);
box.jsx
//定义组件

// imrc把react import进来
import React, { Component } from 'react';

//写一个box,box有两个按钮,按钮可以控制box左移还是右移

//定义一个类组件 cc
class Box extends Component {
    //局部变量
    state = {
        x:0,

        // 1.3.7 渲染列表
        colors:['red','green','blue']
    }

    // this是undefined因为onClick函数,我们不知道react是在什么地方调用的,
    // 但是我们希望让我们的this指向我们当前的class
    // 这个this我们并不知道他在调用的时候react在什么地方是什么东西调用的onClick,
    // 但我们知道他应该不是在我们的box类上调用的这个函数,所以this就会变成一个很奇怪的值
    // 但是我们希望让我们的this取值取成我们thisclass:
    // 1.用箭头函数(箭头函数是不会重新绑定this值的,由于箭头函数内部是不会给this重新赋值的,所以这个this就是外面这个this就是Box)
    // 2.用bind .bind(this)它可以将函数里面的this绑定成我们当前的this
    handleClickLeft=(step)=>{
        // 想让state的值的修改影响到render函数的话,就要用setState函数
        // setState函数里边不仅会修改state的值,而且会将当前组件的render函数重新调用一遍
        this.setState({
            x:this.state.x-step
        })
        //点击左按钮让x减一
        // this.state.x--;

        console.log("click left",this);
    }
    handleClickRight(step){
        this.setState({
            x:this.state.x+step
        })

        // this.state.x++;

        console.log("click right",this);
    }

    // 1.3.11 给事件函数添加参数
    // 1.定义一个临时函数
    // handleClickLeftTmp=()=>{
    //     return this.handleClickLeft(10);
    // }
    // 2.不一定要把这个函数定义出来,可以直接用一个箭头函数,或者匿名函数把他定义出来


    //定义css样式
    // styles = {
    //     width: "50px",
    //     height:"50px",
    //     backgroundColor: "lightblue",
    //  }

    //Component类的一个函数,用来返回当前这个组件最后渲染的html的结构是什么
    //react里面的每一个元素都必须是一个标签
    render() {
        return (
        //虚拟元素,渲染的时候不渲染他,他只会帮我们在react里合法而已
        <React.Fragment>
            {/* <div>{this.state.x}</div> */}
            {/* <div style={this.styles}>{this.toString()}</div> */}
            {/* 所有在jsx的html标签里面写的逻辑多要用大括号括起来,style标签里面需要写一个对象,对象使用两个大括号括起来的 */}
            {/* style外面的括号是指明他是一个表达式,里层的大括号表示里面是一个对象 */}
            {/* <div style={{
                width: "50px",
                height:"50px",
                backgroundColor: "lightblue",
                color:"white",
                textAlign:"center",
                lineHeight:"50px",
                borderRadius:"5px",
            }}>{this.toString()}</div> */}
            <div style={this.getStyles()}>{this.toString()}</div>

            {/* bootstrap里面面margin的简写方式:m-2 */}
            {/* 1.3.9 绑定事件 onClick绑定事件,onClick是绑定一个函数, 并不是让我们调用这个函数,
            所以这里传的是一个函数,而不是执行这个函数,所以不能加(),加()是在渲染的时候就把值求出来,
            但是其实我们是把这个函数传个他,并不是把函数的返回值传给他*/}
            {/* <button onClick={this.handleClickLeftTmp} className='btn btn-primary m-2'>left</button> */}
            <button onClick={()=>{
                // 匿名函数写法
                return this.handleClickLeft(10);
            }} className='btn btn-primary m-2'>left</button>
            {/* 匿名函数简写方式 */}
            <button onClick={()=>this.handleClickRight(10)} className='btn btn-success m-2'>right</button>

            {/* 1.3.8 Conditional Rendering,利用逻辑表达式的短路原则
            当数组里面没有元素的时候输出一句话 */}
            {this.state.colors.length === 0 && <p>No colors</p>}

            {/* map函数将数组里面的每一个元素color依次转化为另外一个元素div
            如果用遍历类写法,一定要给每一个标签都加一个属性key,并且key一定要不一样才可以*/}
            {this.state.colors.map(color=>(
                <div key={color}>{color}</div>
            ))}
        </React.Fragment>
        );
    }

    // 1.3.6 数据驱动改变Style
    getStyles(){

        let styles = {
            width: 50,
            height:50,
            backgroundColor: "lightblue",
            color:"white",
            textAlign:"center",
            lineHeight:"50px",
            borderRadius:"5px",
            // 让值同时改变小方块的位置
            marginLeft: this.state.x,
         };
         if(this.state.x<=0) styles.backgroundColor='orange';
         return styles;
    }

    toString() {
        //解构函数
        const {x}=this.state;
        return `x:${x}`;

        // return `x:${this.state.x}`;

        //可以在任何地方定义html,在html里写js的话都要用括号括起来
        // return <h1>{x}</h1>
     }
}

export default Box;