
这里举一个四叉树图片模糊的例子来说明,分治法的应用
原始图片

简单模糊后的效果

马赛克的实现原理,和这个一样一样的。
四叉树 分治的简单原理
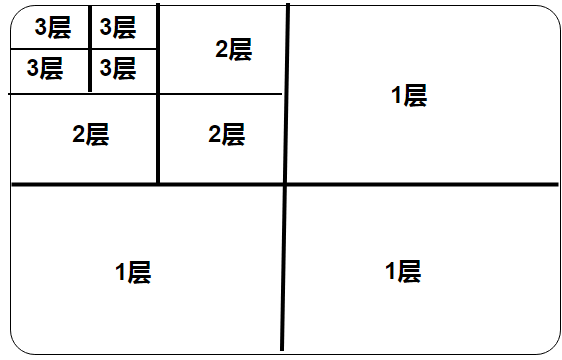
设左上角为坐标为 (x1,y1) 右下角的坐标为(x2,y2)
则原始矩形为 Rect((x1,y1),(x2,y2))
不断分割该矩形,先将矩形分割成4个
左上 : Rect((x1,y1),(x1 + (x2-x1)/2,y1+(y2-y1)/2)
右上 : Rect((x1,y1+(y2-y1)/2),(x1 + (x2-x1)/2,y2)
左下 : Rect((x1+(x2-x1)/2,y1),x2,y1+(y2-y1)/2)
右下 : Rect((x1+(y2-y1)/2,y1+(y2-y1)/2),x2,y2)
然后不断向下递归 ,分割矩形
递归的结束条件,就是
abs(x2-x1)<M 即可 (最小矩形的长宽)
然后开始处理像素点
这里 简单处理了,就是把最左上角的像素点,赋值给 整个最小矩形块即可
复杂度
设图片高为 height
宽为 width
n = height* width
则复杂度为:
O(nlogn)
代码实现
import cv2
import numpy as np

def quardTree(image,startR,startC,endR,endC):
    if endR<=startR or startC>=endC:
        return
    print(startR,endR,startC,endC)
    if endR - startR <= 32 or endC - startC <= 32:
        print(startR, endR,"end rreturn")
        color = image[startR, startC]
        for row in range(startR, endR, 1):
            for col in range(startC, endC, 1):
                image[row, col] = color
        return

    quardTree(image, startR, startC, startR+int((endR-startR)/2), startC+int((endC-startC)/2))
    quardTree(image, startR, startC+int((endC-startC)/2), startR+int((endR-startR)/2), endC)
    quardTree(image, startR + int((endR-startR)/2), startC, endR, startC+int((endC-startC)/2))
    quardTree(image, startR+int((endR-startR)/2), startC+int((endC-startC)/2), endR, endC)


img = cv2.imread('H:\\python_code\\0abc.jpg')
height = img.shape[0]
width = img.shape[1]
print(height,width)
quardTree(img,0,0,height,width)
cv2.imshow('Honeymoon Island', img)
cv2.waitKey()